
September 2, 2025
Explore the essential aspects of actuators in web guiding systems in this episode of our webinar series on Web Guiding Fundamentals. Discover the various types of actuators, including pneumatic, hydraulic, and electromechanical, along with key terminologies such as thrust, correction speed, and backlash. Learn about the significance of actuator sizing, web speed, and the impact of gravitational effects. Ideal for anyone looking to deepen their knowledge on steering guides and actuator functionality in modern web handling systems.
Transcript
Show full transcript (742 words)
[Music] So in terms of actuators, there are lots of terminology that is involved. Some of them are thrust or power, how fast the accelerator is, what is the correction speed, what is the acceleration, stroke length, mounting, what type of coupling we have and things like that. Actuators are pretty standard right now. It's not as important as installation of a web guide or the sensor, but it is an important part of a web guiding system.
The older actuators were either pneumatic or hydraulic. You had an hydraulic pump pumping a double acting cylinder and moving the web guide structure. These were more common in the 50s and up to about maybe '90s before the electronic electromechanical actuators started coming into the market. You could have pneumatic actuators or hydraulic actuators.
The hydraulic actuators have the advantage that it can provide high thrust and can shift large loads quickly. Even now in metals industry, hydraulic actuators are pretty common. You can see them. But the problems are that it's a problem with maintenance.
You need to balance the valves and stuff like that. Change the filters. They could cause leak and this could contaminate your product. And then the precision and accuracy that you can get with an electronic actuator or electric actuator is not something that you can expect in an hydraulic actuator.
So most web guides nowadays are going to use actuators like what these actuators usually have a motor that drives a belt pulley system. There's usually a lead screw, a ball screw or a roller screw that converts the rotary motion into linear motion at the end of the actuator. Some common terminologies that you would see with actuators are maximum current, voltage, power. Whenever we have something with a lead screw or a pitch, that's a common term.
What is the lead of the actuator? Pitch of the actuator. Gearing ratio. Backlash is another thing that you would commonly see with electric actuators, especially with low-end lead screw actuators.
Resolution. What is the smallest movement an actuator can produce? Back drive is a common terminology especially if you're installing a web guide that has to work against gravity. And then types of actuators you have inline and reverse parallel.
Some actuators have limit switches or end stops. And then type of motor used in the actuator. You would commonly see servo stepper brushed or brushless DC motor. So actuators are providing the driving force to the guide structure so that it can position the web.
In terms of thrust, the thrust is the amount of force exerted by the actuator to move the guide structure. And this thrust really depends upon as we saw before mass of the structure that we are trying to move, what is the friction there, how fast you want to move and sometimes gravity as well if you're acting against gravity. In terms of sizing actuators, these are some of the things you need to know to size an actuator properly. a web blind speed mainly because if you have a slow moving web the maximum disturbance frequency you can get depends upon the speed of transport of the web.
If you're moving at 100 ft per minute you might not need a high dynamic response while if you're moving at high speed you might need a much higher dynamic response. The dynamic response is related to the acceleration. Acceleration is related to the thrust. So that's why line speed becomes important.
Guide structure weight and roll weight. If you're trying to move a big mass, we need to know that what type of bearing you're using. So that what is the breakaway force that we need to overcome based on the coefficient of friction of the bearing and then what kind of disturbances we are trying to correct for. There is a correlation between the amount of disturbance that can propagate through a roll-to-roll machine that really depends upon the speed of the web.
The faster you go, higher frequency disturbances can go through. So the web acts as like a low pass filter and then the acceleration and then if you have to look at any gravitational effects. These are some of the key factors that are involved in properly sizing an actuator. But like I said, actuators are pretty straightforward nowadays.
Just need to have some basic questions answered and then we'll be good to go. [Music]
October 16, 2019
Converters can save money and time by installing a North American Web Guide Upgrade kit from Roll-2-Roll Technologies.
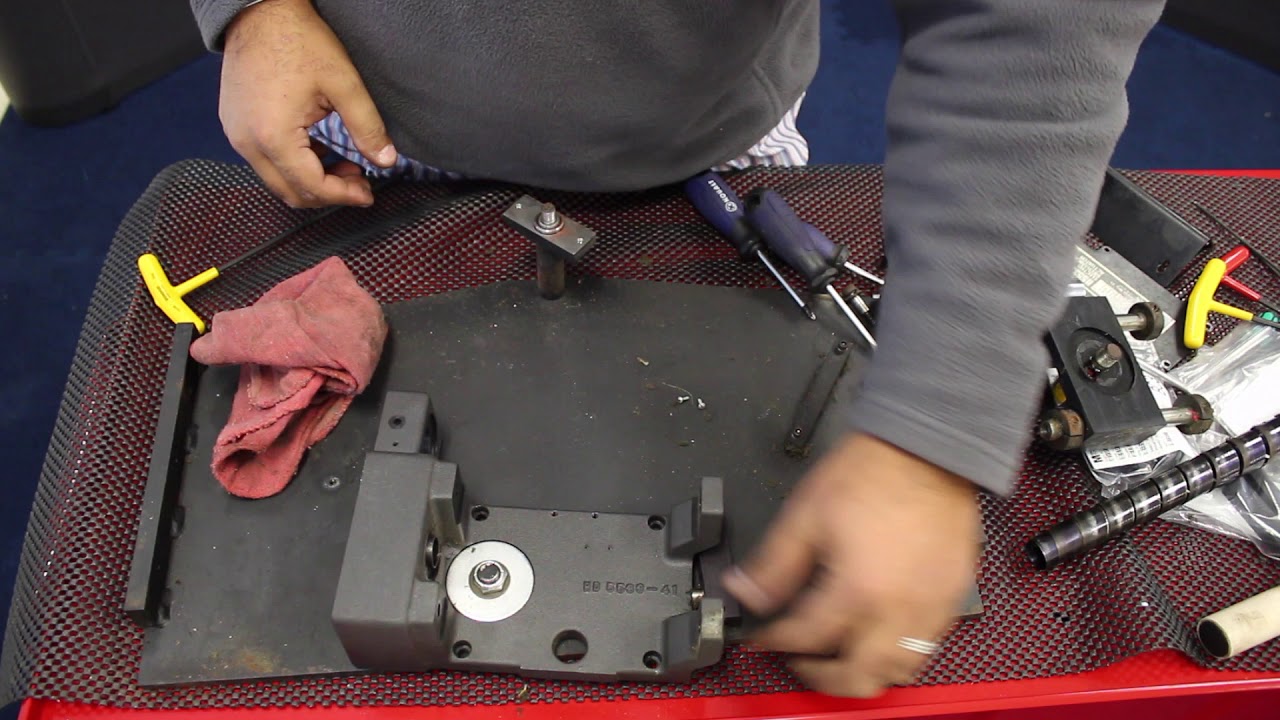
In the video we demonstrates the replacement of the actuator on an old North American Web Guide as part of the upgrade process with Roll-2-Roll® Web Guide Upgrade Kit, with controller, sensor and actuator.
The video shows step by step the process of removing the existing actuator and replacing it with a Roll-2-Roll Technologies actuator.
Transcript
Show full transcript (1100 words)
we're retrofitting our north american h5533 actuator wider web guides might have this cam roller smaller web guides may not have these two extra supports this is the pivot pin in the back of the webcam there's also a spring washer right here all these now we should be able to remove the top off that's what is inside so it should be a set of bearings here there's a washer right there the back of this we're going to have some needle roller bearings so let's just take them away and put it on right here and let's grab these doors uh bearings for me to grease them you need to grease them that's about it these two are the supports on the either side we'll just use them later on okay and we'll leave this in place here this is where the actuator is mounted okay so this is the old mechanism that they have there's a motor that's driving a pulley there's a gear reduction there and that pulley is actually connected to an even smaller pulley driving another pulley that's driving a lead screw so pretty complicated kind of mechanism when we go over our retrofit we'll show you how this is being simplified with our system we do not need to save any of these drive mechanisms because we're going to completely replace it with our actuator so well there's some more pretty small motor for a pretty big web guide actually now what we're going to do is remove the lead screw and in order to do that we need to remove this right here as you can see it's got threadlock red on it so let me put it back we'll try to make sure to put the same kind of red on it there's a small cover to the leech from the back so we're going to remove that and this is a spring which is used to cover the lead screw so that the dust and dirt doesn't go in uh the spring seems to be in pretty good shape so we're going to reuse it for a retrofit this is the old mounting recirculated ball bearings and basically you had the lead screw with the reach circulating ball bearings in it it does require some lubrication and stuff like that but we're going to go to a different kind of an actuator where the lead screw doesn't need to be lubricated [Music] just put it back in i'm going to make sure that this is smooth in this case it is not so we're going to take it apart and make sure to clean everything on this and see if we need to replace those bearings in there if not we'll just uh leave it as it as such and then put our actuator in there so this is the linear raceway mechanism seems to be pretty smooth just wasn't aligned properly here so when we put it on we make sure that it's well aligned when we install it and then make sure that this moves freely and then we'll put our actuator in these things on the end right here there are basically stops so that would limit the web guide from moving all the way through the raceway and stop at these tops these can be adjusted based on your need but for now in our case we're just going to keep it as it is and install the other things this is the servo center sensor right here we will replace it with our sensor so we don't need this one so we wouldn't need any of these let's see the other thing with these web guides is that they have this pivoting mechanism right here so when the actuator moves in and out in order to make sure that the geometry makes the web guide move along the rail uh you need some pivoting and that's why we have this in this part right here seems like it's a little bit tight so we're going to take it apart and check everything and then put back everything so that we can make it run smoothly again these are all needle thrust bearings so a couple of layers of them with the spacers in them that makes it easy for this to move so it does seem like just the just the tightness of this was not making it move properly so when we put it back in we'll make sure to tighten it appropriately so that it's not hard to move okay again we're retrofitting our north american h5533 actuator so for this particular actuator we have a mounting with our actuator and just a pivoting rod that basically holds the carriage so we have that so when you're ready to purchase the retrofit kit we'll supply an actuator with the appropriate lead screw stroke length and everything so that you can retrofit this one so let's go ahead and do that this would be facing this way and let's put these rods in [Music] the only additional thing is that these were the shoulder bolts that you removed unfortunately it doesn't fit in with our mounting bracket so we would supply a spacer with a longer shoulder bolt on it and we will use that to mount that onto the system right there and let's go ahead and get this finished and that's about it so do not forget to put the bearings these bearings need to go in here we check them out and these needle roller bearings seems to be fine so we're just gonna put it right there and put this one this one goes right here with this nut so right now just to show you more or less the final application or all the connections already completed we're just going to show you that we can jog already with our control we can jog our our motor in position furthermore if i just place my hand to use as a material a possible material i'll just put it in automatic and you can see how it moves the whole thing so there you go it's a pretty uh easy setup for us so if you have an old web guide such as a north american and you want to do a retrofit this is we can provide you with a retrofit kit you can either install it or in some cases you can send us a web guide to us and we can do the retrofit for you you