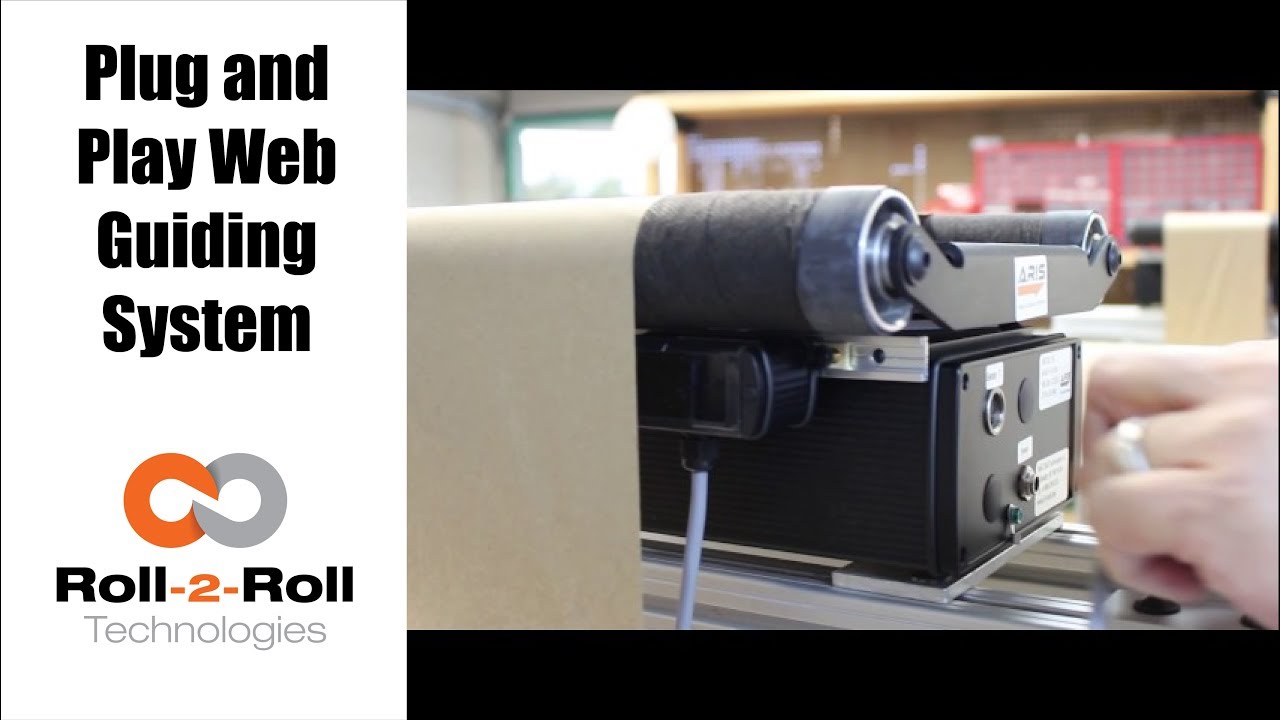
Check out this video to see how easy it is to simply plug in and use our web guiding system without any type of setup or calibration.
Transcript
Show full transcript (324 words)
this is February Lascaux of rolls roll technologies in our series of showing you about that some features of our webcast and today we want to show you how simple it is to install the cat just to put it in operation right now we're showing you a 12 inch web guide which if we have installed in our testbench and it's a really simple it's four points where we actually fix it to the Machine and what happened the same one you're in your facility now in this case we already thread the machine the web guide with some the two and we have position the sensor where we would like to show a habit position as you can see it's a very simple sensor so it only has one face and so it's a taken away from the u-shape remember our sensors can actually detect any kind of material without having to be adjusted and now as you can see on the back side of our guide you can see that there are only two positions that we're going to plug into the first one is we plug in the sensor we have actually identified the sensor position sensor 1 and then we connect our power supply just fix it to it and if we look at the other side that as you can see the web guide reacted because it's already in operation let's go to the other side to the front and you can see our panel right here see and now it's indicating that it has located the sensor and it's ready to go and now I'm going to put this machine to work as you can see this is a very simple installation what we did let's just plug into two cables and when the key is operational come with us to Roloff acknowledges and this melts you understand more or less and how I guess didn't plug in place
The compact web guiding system from Roll-2-Roll Technologies is powered by the ARIS web position sensor. The revolutionary sensor technology enables the web guide to work with any material without the need for setup or calibration.
Transcript
Show full transcript (106 words)
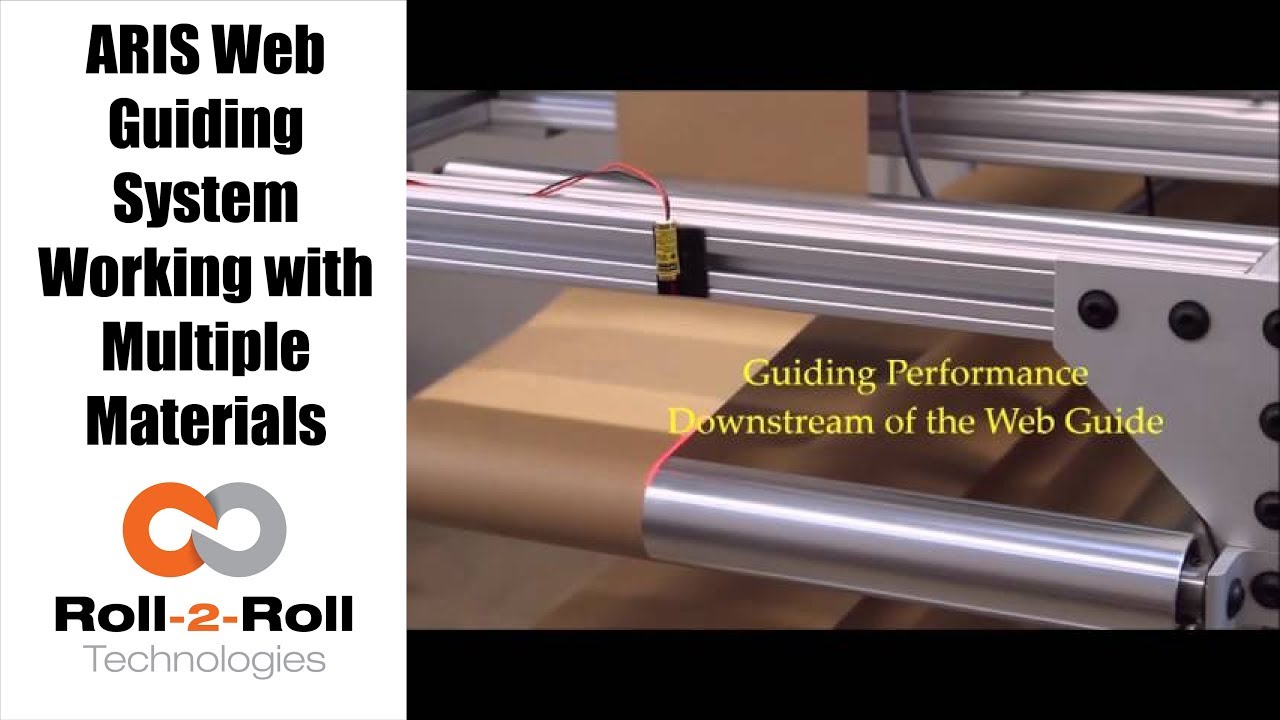
RS is an intelligent guiding system that uses a revolutionary fiber optic sensing technology to accurately measure web position in this video we use a two guide test machine to show how RS handles change in materials one machine creates the disturbance while one corrects this disturbance air patented agnostic material sensor allows RS to adapt seamlessly to any material including paper transparent plastic non-woven and textile without having to manually readjust the machine watch the red laser to see the difference between the controller when it is on versus when it's off you can find a link to more information in our description below e
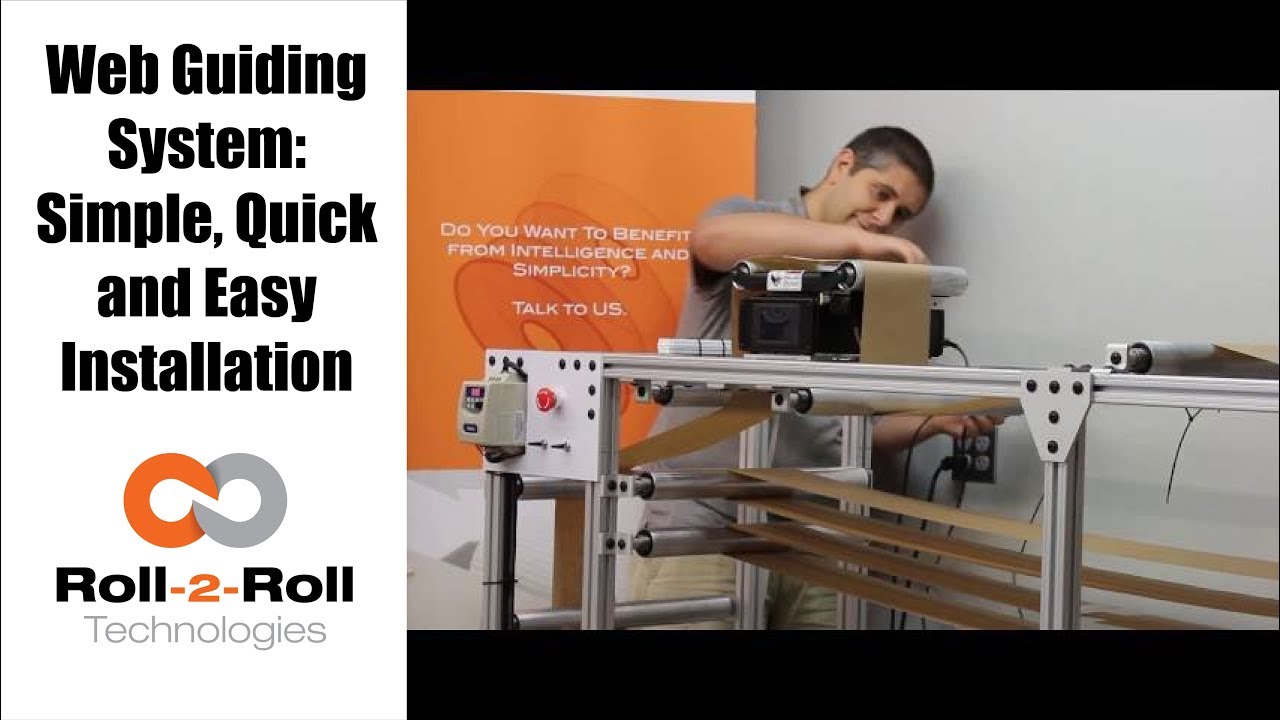
This video shows how easy it is to install the Roll-2-Roll Technologies Compact Web Guiding System. The complete installation and commissioning can be done within seven minutes.
Transcript
Show full transcript (366 words)
In this video we show how quick and easy it is to install an ARIS Web Guiding System. Unpack the box and lay down all the components such as the cables, web guide mechanism, the web position sensor and power supply. The compact web guiding system is pre-wired for easy installation. All that is required is a single allen wrench tool to fasten the web guide to your machine frame using the mounting holes at the bottom of the web guide.
We even provide the 6 millimeter mounting screws with spacers to make it really quick and easy for you. Carefully unscrew the four mounting screws and spacers from the web guide. Place the four spacers over the pre-drilled mounting plate on your machine. Carefully set the web guide over the spacers paying attention to the direction of travel of the web.
Use an allen wrench to securely mount the web guide onto your machine frame. The compact and lightweight design of our web guiding system makes it easier for quick installation on your machine. The mounting holes also provide the necessary electrical grounding of the web guiding system if the machine frame is properly grounded. Please refer to our user manual for more information about grounding.
Next mount the web position sensor on the aluminum rails already mounted on the web guide. Use the thumbscrews to secure the sensor to a desired position. Using the 12 pin DIN connector on the sensor cable, connect the sensor to the web guiding system Make sure to thread the sensor connector all the way through to secure it in place. Next connect the power to the web guiding system using a pre configured power supply.
Once the web guide powers ON set it to automatic control and the web guide is ready for operation. NO other setup or calibration is required. The intelligent control system takes care of the rest of the settings for the sensor and the controller. We have spent the time on R&D so that you save every minute of your valuable time.
That’s how quick and easy it is to install our guide. All in less than 7 minutes. For more information please contact us.
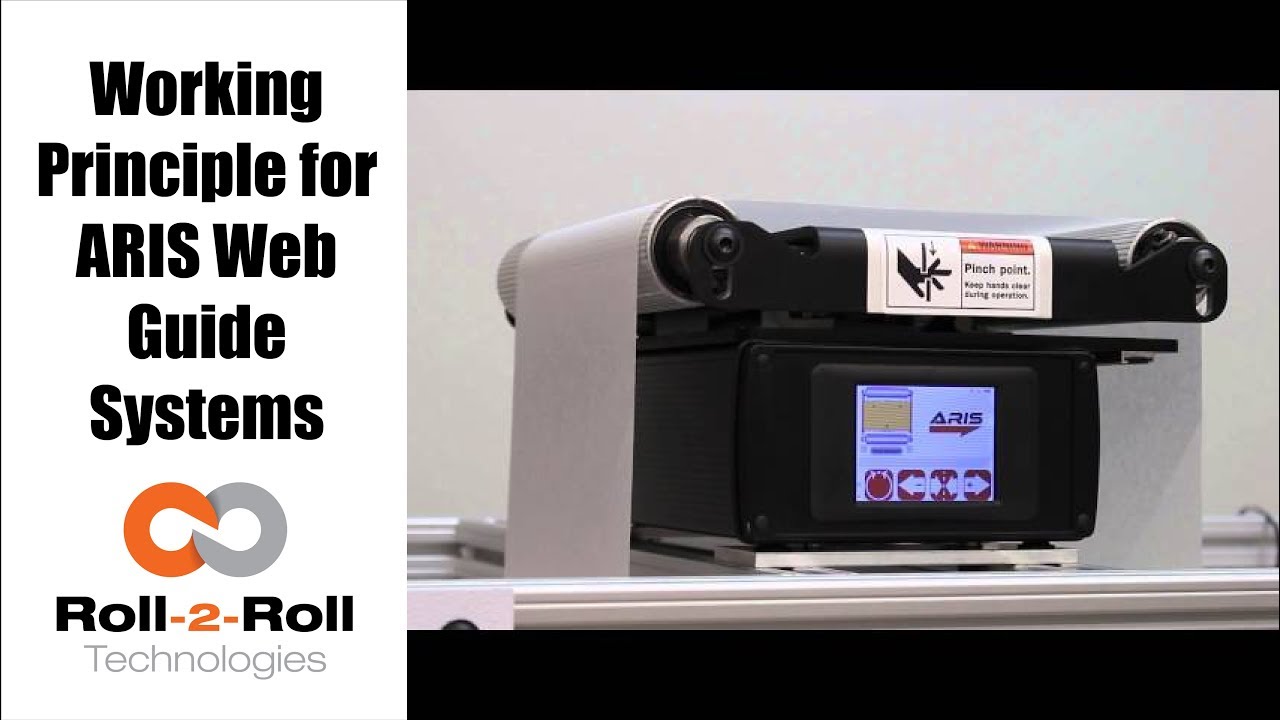
Roll-2-Roll Technologies shows the latest in web guiding equipment. Watch this video for an overview of our web guiding system and sensor's capabilities.
Transcript
Show full transcript (448 words)
our web guidance system RS features the latest in web garden technology in adapts to any material requires no calibration and it is very simple to setup our technology allows the sensor to be material agnostic this means ours accurately detects the web edge position of any materials used without the need for manual adjustments our SS sensor technology works differently than any other currently available sensor in the market it uses the reflection of infrared light to take a picture of the edge of the material this pictures and processed using digital signal processing algorithms to accurately sense the true position of the material irrespective of its physical properties other sensors use a blocking technique where the web is used the block light sounder air since the amount of blocking depends on the material properties the current sensing technology is less accurate with porous or transparent materials ultimately the web Guardian performance is affected by the inaccurate sensor measurement in addition to sensing capabilities ours communicates intelligently with the sensor watch the screen as we show how the sensor communicates with ours a green web detected indicator will verify that the edge is detected by the sensor if the sensor is not connected properly or if the edges outside the window the indicator will not really about the icons you will see a material edge position indicator when the material is in the correct position you will see one red bar and one green bar the green bar indicates the metal portion of the sensor and ideally the web should be in the green bar region if it's incorrectly positioned you will either see no green bar or you will see red bars on both sides of the green if the sensor is not within the measurable distance then the material edge position indicator will be grave the sensor position indicator on either side of the web guide picture shows the position of the sensor with respect to the guide if the sensor indicator does not register the sensor on a correct side of the web or the green bars is white on the wrong side of the web press the find sensor to automatically register at the sensor position indicator to make it simple and foolproof the intelligence and ours can work irrespective of the sensor position as long as the web is inside the sensing window if no sensor is connected or if the sensor is faulty none of the position indicators will be lit when the sensor has plugged back in ours will automatically register the correct sensor position find out more about Aras and our sensors using the link in our description below
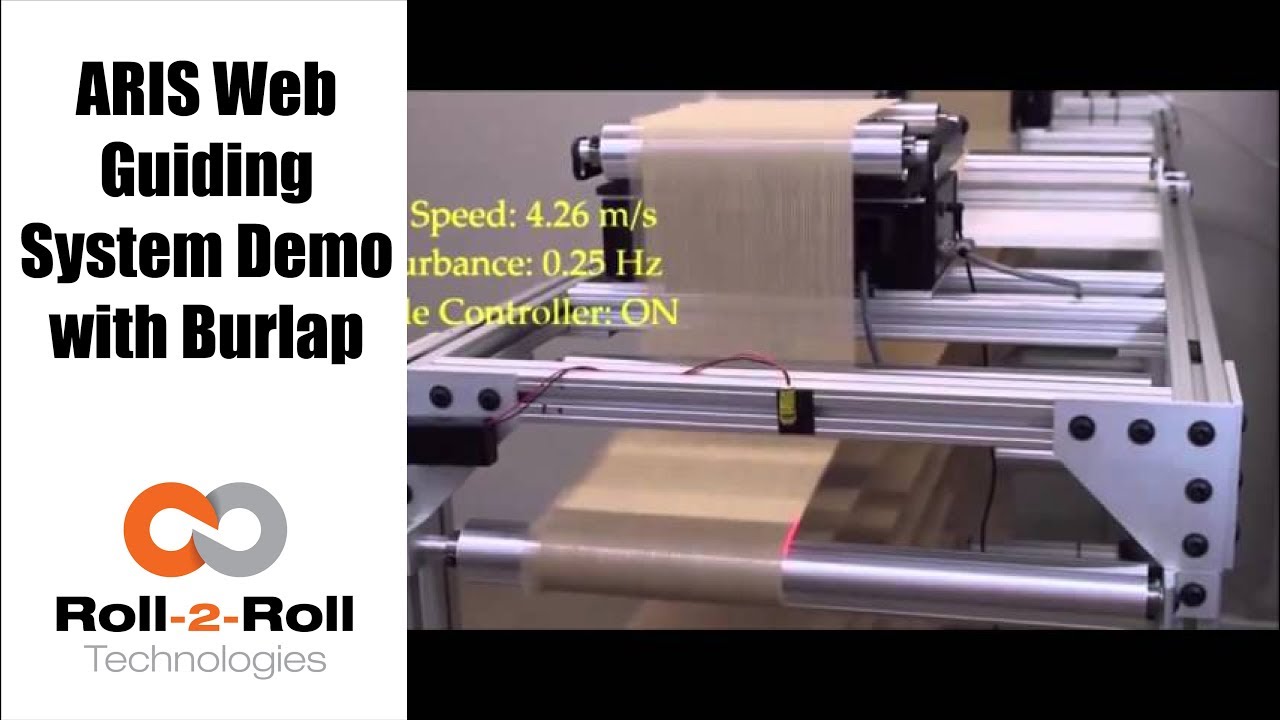
The performance of the compact web guiding system with a challenging porous web, burlap web is shown in this video.
Transcript
Show full transcript (125 words)
The video shows ARIS guiding a burlap web at different frequencies and a web speed of 4.26 meter per second. Using a two guide test machine, we will show you several speeds and several disturbance frequencies that are introduced to evaluate the performance of ARIS when it handles burlap, a non-porous material. Watch the red laser to see difference of the controller when its on vs when its off. As a porous material, burlap presents a special challenge because current sensing technology is not able to handle the gaps between the threads of the material.
The image processing in the sensing technology in ARIS allows it to detect the edges of a porous material. You can find a link for more information in our description below

At Roll-2-Roll Technologies we want to offer you the best products possible. We do extensive research and testing to optimize our web guiding technology. Check out this video to see how we collect data on our web guides.
Transcript
Show full transcript (351 words)
Hi, this is Pedro Velasco with Roll-2-Roll Technologies. Our products are based on our own research. Every so often we'll go back and do some more testing and we do some further investigations of our products work. In this case, I want to show you this is one of test benches.
We build this on our own. Right now, we're actually doing some some data collection on our newest web guide, which is the compact low profile Displacement guide and what we're trying to do right now is we're putting in a disturbance upstream sinusoidal disturbance and then we're recording comparing what the material coming in, how it's coming in and compare with the material coming out, the result of correction through our web guide. We take all that data and then we do some comparisons and make some corrections and further improve the way our systems work. So right now, we're showing you the downstream side of a web guide and what we're doing is the sensor on this sensor here is actually reporting the information from the data at the position of the web guide and of course our web guide is being controlled or guided thanks to that sensor that we have over there, which is a sensor that's provided with the web guide.
As you can see from this view we can see the sinusoidal disturbance being caused by one of our web guides on the front through programs that have to do that for us and then downstream closer to the camera, you can see the our featured web guide doing the correction. Now one of the features our controls is they learn on their own. And that's part of our algorithm So we take the information from this and we further correct it. also allows us to create other features for our customers such as the KOIOS data analytics which can actually help predict other problems upstream from where the web just based on information that are systems provide.
You can see more of the information our web guides at www.r2r-tech.com

See a new steering guide system for the roll to roll converting industry. This new steering guide is easy to install and simple to use. It's a plug and play system perfect for long entry spans processes like ovens.
Transcript
Show full transcript (252 words)
Hi this is Pedro Velasco with Roll-2-Roll Technologies . Today we're going to talk to you about one of our line of web guides within the narrow web applications, specifically steering guides These come with the same features as the displacement guides that we are well known for. These are especially for applications where you have a very long entry span into the into the web guide, for example when you're coming off an oven and you need an application right after the oven, The steering guides come with the same linear displacement actuators and they also come with the air SCU5 sensor control unit which is the brain of the web guide and then also with the ARIS WPS web position sensors which come in sensing width of 48 mm up to 221 mm. Our steering web guides come with either grooved rollers or smooth rollers.
Now we recommend the grooved rollers if you're running webs at very high speeds, therefore allowing you to eliminate the entrapped air between the web material and the surface of the roller and eliminating any slippage. With these web guides you can edge guide, center guide, and additionally contrast and line guide using our white light contrast sensors You can actually guide any type of material with no need for calibration of the sensors and it's a very easy to install and operate system. We are Roll-2-Roll Technologies and and you can talk to our experts by contacting us through our website www.r2r-tech.com

Do you have an existing web guide with outdated sensors and control unit? We now have a solution with our upgrade kits featuring Roll-2-Roll® Web Sensors and Control Units for all electromechanical web guide systems, providing advanced edge and center guiding capabilities.
Transcript
Show full transcript (2182 words)
Hi, this is Pedro Velasco with roll-to-roll technologies in a previous video we showed you or we talked to you about the advantages of using a retrofit kit when you need to replace your existing web guiding system especially if you're a integrator or a rebuilder of machinery even an end-user. This is one way to save some money, so you keep the mechanical part of your web guide But then you use a retrofit kit in order to improve its application now You're getting the best in controllers and the best in sensors technology available at that time so Whenever you order a kit from us you'll probably get a Control unit which is clearly labeled and helps you in the orientation as to how the screen will be. So you will have the sensor Ports and then you will have on the side power connection the motor connection And if you have order an Ethernet communications option it will be there, too. You will also get a sensor or sensors depending on what your application Maybe even a sensor rail if you need so But that it's up to the user as to where they want to place the sensor.
You also get an actuator With it's a own motor driver and then a servo-center sensor with its brackets right. And then all the other accessories are required in order to do the installation. Ok so the first thing you would like you would want to do when you receive your Your kit is you want to verify that it it's in working condition I mean we do packages the best way possible we want to avoid any problems. So the first thing you do is you power up your control unit and you will receive a Connecting cable like this, but for the sake of this demonstration.
We're just gonna use a pre connected power supply. So you will connected to your power power right and then the screen should light up right and then you can proceed to Connect your sensor now remember our technology allows you to do this without having to do any calibration so it's a very simple and a very simple operation so Here you go, so I have now connected my sensor And I can verify if it's working as you can see on the screen, it's working so that we have done that step so After checking your the control unit with the sensor and just powering it up we want to then proceed to Installing the motor so when you get the motor or the actuator you will get an actuator with the mounting bracket And the motor driver okay? So first of all we just want to do is we're gonna do a wiring here Show you how to how you can connect the wiring, but typically we will give it to you pre-wired now There are some exceptions people have some special requirements And they want to do a wiring themselves, but will also give you instructions how to do the wiring. But in this case we're just gonna go through the whole process so first of all you would have to install the bracket I'm gonna use this The plate that we have for the demonstration purposes, but you would have to have this already pre-drilled It's a 4m 4mm screws and then we just Do the just put the bracket on and screw the bracket on to the plate so one thing that you have to be Cognizant of as we're installing the bracket We also have to install the servo- center bracket.
Now the service center bracket now only has one position it goes to this side right so you have to install it at the same time you're installing the motor bracket and so you use your 4mm 4mm screws and you have to install it within the brackets into the plate So here I show you that I have installed the bracket and installed the other bracket for the motor or for the actuator and the bracket for the servo-center As you can see I have the screws mounted here in here right something you have to consider you have to align the motor make sure that this bracket aligns the motor with the the Connection for the actuator to the web guiding mechanism right and of course the servo- Center. It has a one position only so and that will get installed in the next step. Okay, so once I have all the brackets installed then and I have aligned it then I place the motor and notice that I am placing the motor with the cable side on Opposite of where the several Center bracket is at right. I would screw this on and then I would get the servo Center sensor So in order to install the servo-center when it comes it has two nuts right and so you Put it through the hole on the servo-center bracket install the Locking nut and just Score it back on and one thing that you have to do is we recommend that you have the distance between the face of the servo Center sensor and the screw of the actuator An eighth of an inch is a pretty good distance that will work enough and you can actually adjust that by just adjusting the back Nut in order to create the space Okay, so now that we have installed.
Let me give you a piece of advice because there are certain vibrations on the web guides that is operating and you don't want the servo-center to Sensor to move we recommend that once you have determined the appropriate appropriate distance of the servo-center sensor Just put a little drop of Loctite glue on the back nut and then after you secure the front nut then before you secure it just put a little bit on that too right and that will keep the sensor in position. okay, so now that you have installed the Motor on the motor bracket or the actuator on the motor bracket and the servo- Center on its bracket Then we want to do the wiring. However we provide the driver Motor driver in this enclosure. Now you have two options to put places enclosure within your operation one is a you actually fix it to a plate or something where you can just drill a couple of holes.
We provide the Dimensions for this for you so you can do that that operation. You would probably recommend a m3 and screw on this. However We also provide the option where you can just put it on a din rail, so those are two things you can do when installing. Okay, so When we're going to wire this, it's clearly labeled we will provide you with a sheet where it gives you the locations of each of the wires.
However typically we will send this to you pre wired But in the case that you need to do it on your on your own we have provided this sheet And you'll find that on the p1 section, which is clearly label p1 you will have all the connections for the motor in the Connection from the control unit to the more and on the p5 section. You will have the connections for the servo center unit So before we start connecting cables. Let me give you a word of advice You may not you should not connect the motor Or plug in the connection to the control unit that goes from the motors From the motor driver while the control unit is on This will it's not recommend it so Always every time you can do some operation where you need to disconnect the motor from the motor from the control unit Make sure that the control unit is off Alright, so for the sake of time we went ahead and wire to this. This took us about five minutes to do the wiring but as you can see we followed the table that we have here.
It's all pre-wired according to the table and as I mentioned before never plug the motor driver to the control unit while the control unit is on. So as you can see right now we have we have our control unit off. We're gonna go ahead and proceed and connect the motor driver to it. Now that I've That I've connected the motor driver to the control unit I can proceed to put power to it so Now one thing that we recommend once you do this is just make sure in check that everything is operating so with the control unit on the manual which is when it's lit red.
We can actually check the position of the motor. Just move it around right so We can jog it to one side or jog it to the other side Furthermore we can check the servo-center now. Here's something that we want to tell you about servo- centers sometimes Typically we will send you this already preset But in case it s move or something like that you might notice that the servo- center might be off. It might be because It's in the wrong position, so what you want to do is adjust it.
Now you can find adjust it by moving the servo- center in and out to things you don't want to do you don't want it to be crashing against the the stem of the of the actuator and Second thing is you don't want it to be too far away otherwise it will just go to either one of the Extremes right so once that is set we are ready to then test with the sensor now when we're connecting the sensor to the control unit you have to be very careful because the pins inside the connector are very very fine. So the connector will have a notch and you have to align the notch to the port. So the port rule house will have a notch in there so align those those two and Just don't push it in too hard. Just align them and just screw it right on.
It will come in completely and connect correctly and as you can see right now, so The sensor doesn't detect anything right but right now It's in manual mode, so nothing will happen But I'm gonna check and see and yeah the sensor is actually seeing this the finger in if I put it on automatic Okay it will start moving and then I can verify the sensoring. I servo-ceter again, and it's ready to go when you're specing the motor we actually provide you that the motor comes with an m6 thread On the on the end of the of the shaft motor shaft, however We usually will you know we can work with you if you have another need. Also we can provide you with Different size motors depending on your needs so if you have an application that requires more thrust we can give you a bigger motor or the standard motor that we put in some of our web guides, or if you have a very small application we can use a smaller motor. It's all depends on your needs So all you have to do is just tell us about what your needs are with the motor and you know the connection to this to your web guide it can be you know a Ball joint that you know there's many applications that you can do with this However anytime you need something like this.
We just spec with you we talk to you and we we help you inspecting the The connection for your web guide. So with all the options that we have in motors All the options we have in controls and on it you can apply this to any type of guide Any type of guiding application that you need for example you can use it on a steering guide or a displacement guide even for unwind and rewinds and Just by changing the motor we can use it in any of those applications We we hope this information is useful to you in how to use or how to install one of our retrofit Kits now one thing that we want to emphasize is this is the same technology that is on all our web guides so if you want to see other features that we provide within our control units with our sensors you can look at our some of our other videos that we have through our website. You can see other applications we can do with our sensors. You can see you know how we can actually give you some other features and Make your operation easier to run so We hope this will be a help to you and just contact us or look at our website www.r2r-tech.com

Learn about the many benefits a web guide retrofit kit has to offer. Whether you want to upgrade an existing machine or realize the benefit of the latest in web guiding technology on a smaller budget, retrofit kits are the answer.
Transcript
Show full transcript (366 words)
All right, this is Pedro Velasco with Roll-2-Roll Technologies. Today, we want to talk to you about using retrofit kits in order to improve your existing web line or a production line. So one of the can one of the things that usually a any Integrator or OEM or a rebuilder of machines will face even even an end-user will face is that you have a machine, you have a web guiding system, and you need to replace it But one of the things that we found out is that you really don't need to replace the mechanical components. If you have a retrofit kit You will probably get a lot of bang for your buck instead of expending a lot of money on just a complete web guide.
Advantage of this is that number one, you don't have to buy an expensive web guide system new for your operation. Number two, is that when you buy a new web guide system sometimes because things have changed through the years then you have to do a lot of adjustments within your machine such as drilling new holes, adapting your web guide to that. Number three if you get a retrofit kit, you have the advantage of getting the best or the newest technology that there is in controls and in sensors. So what you usually get when you get a retrofit kit?
Number one, you'll probably get a sensor one or two depending on your application. You will get a control unit. You will get an actuator with a motor driver and of course all the necessary accessories in order to connect all this. So those are the things that you're looking for.
Now in an additional video will teach you or will talk to you about how to do the connection of all these items so you can apply them to your lines. So if you're an integrator, you're an OEM, you're a rebuilder, even an end-user one of the best things you can do is use a retrofit kit in order to get your operation into the best technology available instead of spending a lot of money just getting a new web guide.